
Looking for a smart way to save space while keeping your baby’s changing area safe and convenient? Building a wall mounted baby changing table might be exactly what you need.
Imagine having a sturdy, easy-to-use changing station that folds away when not in use, giving you more room to move and keep things tidy. In this guide, you’ll discover simple steps to create your own wall mounted changing table, even if you’re not a DIY expert.
By the end, you’ll have the confidence to build a stylish and functional piece that makes daily diaper changes easier and more comfortable for both you and your baby. Ready to get started? Let’s dive in!

Credit: www.vevor.com.au
Choosing Materials
Building a wall mounted baby changing table needs careful material choice. Good materials make the table safe and long-lasting.
Focus on wood type, hardware, and safety to create a reliable changing station. This guide helps you pick the right parts.
Selecting Wood Types
Wood must be strong and smooth for your baby’s safety. Hardwoods like maple or oak work well. They resist dents and last longer.
Softwoods like pine are easier to cut but may get damaged faster. Choose wood that does not splinter or crack easily.
Essential Hardware
- Heavy-duty wall anchors to support weight
- Strong screws and bolts for secure mounting
- Hinges that hold firm and open smoothly
- Safety locks to keep the table closed when not in use
- Rubber pads to prevent slipping and protect walls
Use only hardware designed for heavy loads. This ensures the table stays fixed to the wall safely.
Safety Considerations
| Safety Feature | Purpose |
|---|---|
| Rounded edges | Prevents cuts and bruises |
| Non-toxic finish | Protects baby from chemicals |
| Secure mounting | Prevents falls or tipping |
| Weight capacity label | Keeps usage within safe limits |
| Easy-to-clean surfaces | Maintains hygiene |
Check all parts for safety before installation. The table must hold steady and be free of sharp corners.
Design And Measurements
Building a wall mounted baby changing table requires careful planning. This ensures safety and convenience for both parent and child.
Consider design elements and precise measurements to fit your space perfectly.
Determining Size
Choose a size that suits your room and provides ample changing space.
| Room Type | Recommended Size |
| Small Nursery | 30″ x 18″ |
| Medium Nursery | 36″ x 20″ |
| Large Nursery | 42″ x 22″ |
Planning Wall Mounts
Secure wall mounts are essential for safety. Ensure you attach them to wall studs.
- Locate wall studs using a stud finder.
- Mark drill points on the wall.
- Use heavy-duty brackets for extra support.
Adding Storage Options
Incorporate storage for diapers, wipes, and other essentials.
Step-by-step Assembly
Building a wall mounted baby changing table is a smart way to save space. Follow these simple steps to create a safe and sturdy table.
This guide covers cutting wood, assembling the frame, and mounting it to your wall.
Cutting And Preparing Wood
Start by choosing good quality wood. Measure and mark each piece before cutting. Smooth the edges with sandpaper to avoid splinters.
- Measure twice, cut once
- Cut the main panel for the table surface
- Cut side supports and mounting brackets
- Sand all pieces until smooth
Assembling Frame
Build the frame by attaching the side supports to the main panel. Use wood glue and screws for a strong hold. Check that the frame is square before tightening screws.
- Apply wood glue to joints
- Screw side supports to the main panel
- Use a carpenter’s square to check corners
- Let glue dry for at least one hour
Mounting To Wall
Find wall studs to secure the table safely. Mark drill holes on the wall and the frame. Use heavy-duty screws and anchors for strong support.
- Locate and mark wall studs
- Drill pilot holes in frame and wall
- Attach frame using screws and anchors
- Check stability before use
Credit: www.vevor.com.au
Finishing Touches
After building the wall mounted baby changing table, it is important to add the final touches. These steps improve safety and comfort.
Proper finishing also makes the table look neat and last longer. Let’s look at key finishing details.
Sanding And Painting
Sanding smooths the wood surface and removes rough spots. Use fine-grit sandpaper to avoid scratches.
Painting protects the wood and gives a clean look. Choose non-toxic, baby-safe paint or finish.
- Sand all edges and surfaces evenly
- Wipe dust before painting
- Apply at least two coats of paint or sealant
- Let the paint dry fully before use
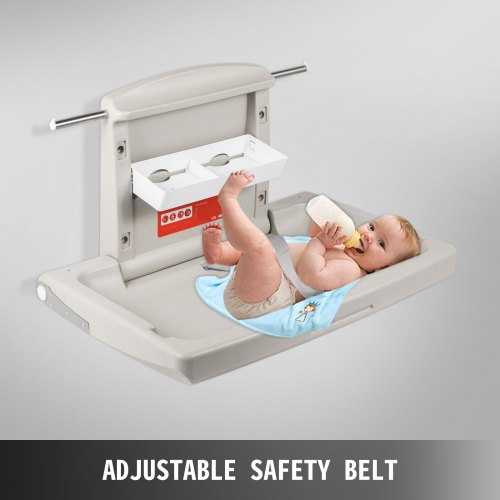
Installing Safety Straps
Safety straps keep the baby secure during diaper changes. Install strong straps that are easy to use.
Attach straps tightly to the table frame. Check that buckles work well and straps are adjustable.
- Use durable, washable material for straps
- Place straps at safe points on the table
- Test straps before each use
- Replace worn or damaged straps immediately
Adding Comfort Features
Comfort makes diaper changes easier for baby and parent. Add padding and soft covers to the table surface.
Consider adding side rails or small shelves to hold supplies within reach. These features help keep the area organized.
- Use thick foam padding with a waterproof cover
- Attach soft, removable covers for easy washing
- Add rails to prevent baby from rolling off
- Install small shelves for diapers and wipes

Credit: www.amazon.com
Frequently Asked Questions
What Materials Are Needed For A Wall Mounted Baby Changing Table?
You will need plywood or MDF, wall anchors, screws, hinges, paint or sealant, and safety straps. Choose sturdy, safe materials that support the baby’s weight and are easy to clean.
How Do You Ensure Safety In A Wall Mounted Changing Table?
Secure the table firmly to wall studs using heavy-duty anchors. Add safety straps and rounded edges to prevent falls and injuries. Always supervise your baby during use.
What Are The Space Requirements For Installation?
Measure the wall space where you plan to install. Ensure enough room for folding and unfolding the table. Leave clearance for comfortable access and movement around the area.
Can A Wall Mounted Changing Table Support Heavy Weight?
Yes, if mounted correctly on strong wall studs with proper hardware. Use quality materials and follow weight guidelines for safety. Avoid overloading beyond the recommended weight limit.
Conclusion
Building a wall mounted baby changing table saves space and adds convenience. You only need basic tools and materials to start. Follow each step carefully for a safe and sturdy result. This project fits well in small rooms or tight spaces.
Enjoy the ease of changing your baby without clutter. A DIY changing table also lets you customize size and style. Try it yourself and see how simple it can be. Your baby’s comfort and your peace of mind come first.


