
Looking for a fun and budget-friendly project to upgrade your outdoor space? Making an Adirondack chair out of a pallet is easier than you might think—and it’s a great way to add charm to your backyard.
Imagine relaxing in a sturdy, stylish chair that you built yourself, using simple materials you can find almost anywhere. In this guide, you’ll discover step-by-step instructions that anyone can follow, even if you’re new to woodworking. Ready to turn a plain pallet into your new favorite seat?
Keep reading, and let’s get started!

Credit: www.youtube.com
Materials And Tools Needed
Building an Adirondack chair from a pallet is a great way to recycle wood. Before you start, gather all materials and tools. This helps the project go smoothly.
Using the right supplies makes your chair strong and safe. You will need wood, screws, and some hand tools. Let’s look at the details.
Materials
- One wooden pallet (check for good condition)
- Wood screws (1¼ inch and 2½ inch sizes)
- Wood glue (optional for extra strength)
- Sandpaper (medium and fine grit)
- Outdoor wood paint or sealant
- Wood filler (to fix any cracks or holes)
Tools
| Tool | Purpose |
| Circular saw or hand saw | Cutting pallet wood to size |
| Drill with screwdriver bits | Driving screws into wood |
| Measuring tape | Measuring wood pieces accurately |
| Pencil | Marking cut lines |
| Clamps | Holding wood pieces in place while assembling |
| Safety gear (gloves, goggles) | Protecting yourself during work |
Optional Supplies
You may want a sanding block for easier smoothing. A paintbrush or sprayer is useful for applying paint or sealant evenly. Having a workbench or sturdy surface helps with assembly.
Credit: medium.com
Preparing The Pallet Wood
Building an Adirondack chair from a pallet is a fun project. It needs patience and careful preparation of the wood.
The first step is to ensure the wood is safe and smooth. This will make your chair both sturdy and comfortable.
Inspecting The Pallet
Check the pallet for any damage or rot. Make sure it is safe and free from harmful chemicals.
- Look for broken boards or nails sticking out.
- Ensure the wood is dry and free of mold.
- Check for stamps indicating chemical treatments.
Disassembling The Pallet
Carefully take the pallet apart to use the wood. Use a hammer and crowbar for this task.
Cleaning The Wood
Once disassembled, clean the wood thoroughly. Remove any dirt and old nails from the boards.
Sanding The Wood
Sanding smoothens the wood surfaces. This step is crucial for comfort and safety.
| Grit Type | Purpose |
| 60 Grit | Remove roughness |
| 120 Grit | Smooth the surface |
| 220 Grit | Finish the surface |
Treating The Wood
Apply a wood preservative or sealant. This protects the wood from weather and extends its life.
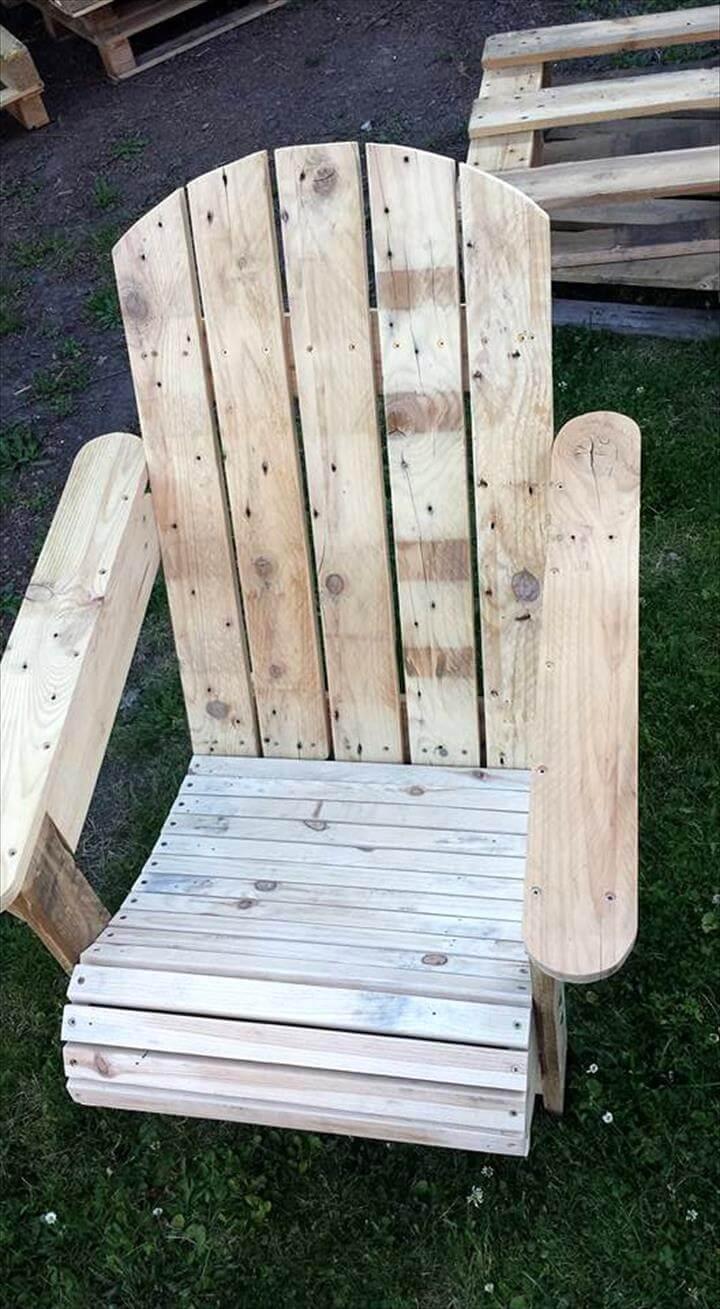
Step-by-step Assembly
Making an Adirondack chair from a pallet is a fun woodworking project. It uses recycled wood and simple tools.
This guide shows easy steps to build your own chair. Follow each step carefully for the best results.
Gather And Prepare Materials
Start by collecting one or two wooden pallets in good shape. You will also need screws, sandpaper, and wood glue.
Break down the pallets carefully. Remove nails and smooth all wood surfaces to avoid splinters.
- One or two wooden pallets
- Screwdriver or drill
- Wood screws
- Sandpaper (medium and fine grit)
- Wood glue
- Measuring tape
- Pencil
- Saw (hand or power)
Cut The Wood Pieces
Measure and mark the wood pieces for the seat, back, arms, and legs. Use the saw to cut them to size.
Keep your cuts straight and clean. This helps the pieces fit together well during assembly.
- Seat slats: 5 pieces, about 22 inches long
- Back slats: 7 pieces, about 30 inches long
- Armrests: 2 pieces, about 25 inches long
- Leg supports: 4 pieces, about 18 inches long
- Cross supports: 2 pieces, about 20 inches long
Assemble The Seat Frame
Lay two long support pieces parallel on a flat surface. Attach shorter cross supports between them.
Use wood glue and screws to join the pieces. This frame will hold the seat slats securely.
- Place supports about 18 inches apart
- Attach cross supports evenly spaced
- Ensure the frame is square before tightening screws
Attach Seat Slats
Place the seat slats across the seat frame. Leave small gaps for water drainage.
Secure each slat with screws into the frame below. Check that all slats are flat and even.
- Space slats about ½ inch apart
- Start from the front and work backward
- Use at least two screws per slat
Build And Attach The Backrest
Arrange the back slats side by side, slightly angled for comfort. Attach them to two vertical supports.
Fix the backrest to the seat frame with screws. Make sure it is sturdy and well aligned.
- Angle backrest about 15 degrees backward
- Use vertical supports about 2 inches wide
- Check for comfort before final fixing
Attach The Armrests
Fix the armrests on each side of the chair. Use the legs and backrest for support points.
Secure armrests with screws and glue. They should be level and comfortable to rest arms on.
- Position armrests about 24 inches above ground
- Attach to the top of front legs and backrest
- Make sure armrests are parallel to the seat
Add Legs And Final Supports
Attach the legs to the seat frame corners. Add cross supports between legs for extra strength.
Check the chair for balance and tighten all screws. Sand any rough edges before finishing.
- Legs should be sturdy and even length
- Use cross supports to prevent wobbling
- Sand all edges smooth
Credit: www.easypalletideas.com
Finishing Touches And Maintenance
After building your Adirondack chair from a pallet, finishing touches make it look great and last longer.
Proper maintenance keeps the chair strong and comfortable for many years.
Sanding And Smoothing
Sanding removes rough edges and splinters from the wood. Use medium-grit sandpaper first, then fine-grit for a smooth finish.
Sealing And Painting
Apply a wood sealer to protect the chair from moisture and sun damage. You can also paint or stain it to add color and extra protection.
- Choose exterior paint or stain for durability
- Apply at least two coats for best protection
- Allow each coat to dry before applying the next
- Use a brush or spray for even coverage
Regular Cleaning
Clean your Adirondack chair regularly to remove dirt and dust. Use mild soap and water with a soft brush or cloth.
Seasonal Maintenance Tips
| Season | Maintenance Task | Reason |
|---|---|---|
| Spring | Check for cracks and loose screws | Prepare for outdoor use |
| Summer | Clean and touch up paint | Protect from sun damage |
| Fall | Apply wood sealer | Shield from moisture and cold |
| Winter | Store indoors or cover | Prevent weather damage |
Frequently Asked Questions
What Tools Do I Need To Build An Adirondack Chair?
You need a saw, drill, screwdriver, measuring tape, clamps, and sandpaper. These tools help cut, assemble, and finish the pallet wood accurately.
How Long Does It Take To Make This Chair?
Building an Adirondack chair from pallets typically takes 4 to 6 hours. This depends on your skill level and preparation.
Can I Use Any Pallet For The Chair?
Use heat-treated, clean, and sturdy pallets. Avoid chemically treated or damaged pallets to ensure safety and durability.
How Do I Finish The Pallet Wood For Outdoor Use?
Sand the wood smooth, then apply a weather-resistant sealant or outdoor paint. This protects against moisture and sun damage.
Conclusion
Building an Adirondack chair from a pallet is simple and fun. You save money and create a unique piece for your space. The steps are easy to follow and need only basic tools. With a little time and effort, you get a comfortable chair.
It also helps recycle old wood and reduce waste. Enjoy relaxing outdoors in your new handmade chair. Give it a try and see how satisfying it feels. A great project for beginners and experienced builders alike.


