
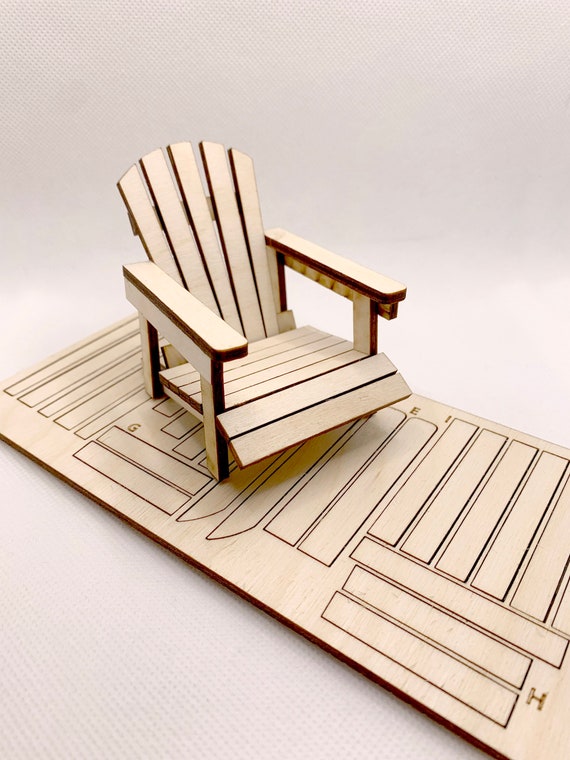
Imagine relaxing in a cozy Adirondack chair that you built yourself—made entirely from simple popsicle sticks. Sounds fun, right?
You don’t need fancy tools or skills to create this charming little chair. Whether you want a unique decoration, a gift, or just a cool project to try, this guide will walk you through every step. By the end, you’ll have a beautiful, handmade piece to show off.
Ready to turn ordinary sticks into something extraordinary? Let’s get started!
Materials And Tools Needed
Making a popsicle stick Adirondack chair is a fun craft project. You need some basic materials and tools to build it.
Gathering the right supplies will help you finish your chair easily and safely.
Popsicle Sticks
Popsicle sticks are the main material for this project. Choose regular-sized sticks for the best results.
- Use clean, smooth sticks without cracks
- Buy enough sticks to complete the chair
- You can find them in craft stores or online
Wood Glue
Wood glue holds the popsicle sticks together strongly. Choose a quick-drying and clear-drying glue.
- Use non-toxic glue for safety
- Make sure it dries clear to keep the chair looking nice
- Check that it bonds well with wood
Cutting Tools
You need tools to cut and trim the sticks if needed. Small scissors or a craft knife work well.
- Use scissors for simple cuts
- A craft knife helps with precise shaping
- Always cut on a safe surface
Sandpaper
Sandpaper smooths rough edges of the popsicle sticks. Use fine-grit sandpaper for best results.
- Sand edges gently to avoid splinters
- Helps the glue stick better
- Improves the final look of the chair
Clamps Or Clothespins
Clamps or clothespins hold sticks together while glue dries. They keep the pieces steady and aligned.
- Small clamps work well for this craft
- Clothespins are easy to use and gentle on sticks
- Use enough clamps to hold all glued parts
Ruler And Pencil
A ruler and pencil help measure and mark the sticks. This makes cutting and placing sticks easier.
- Measure twice before cutting
- Mark where to glue or cut clearly
- Use a sharp pencil for fine lines
Credit: www.etsy.com
Preparing The Popsicle Sticks
Building a popsicle stick Adirondack chair is a fun project. Before starting, it’s important to prepare your popsicle sticks properly.
Make sure the sticks are clean and free of splinters. This ensures a smooth and safe crafting experience.
Gathering Materials
First, gather all the popsicle sticks you will need. This helps in organizing and speeds up the crafting process.
- Collect at least 100 popsicle sticks
- Ensure all sticks are of the same size
- Get some extra sticks in case of breakage
Cleaning The Sticks
Clean popsicle sticks are essential for a tidy finish. Wash them with mild soap and water, then dry them completely.
Sanding The Edges
Sanding the edges of each stick smooths out rough parts. This step prevents splinters and gives a polished look.
Use fine-grit sandpaper for best results. Hold the stick firmly and sand in one direction.
Organizing The Sticks
Organize your popsicle sticks by size and color. This helps in quickly finding the right stick when needed.
| Size | Color | Quantity |
| Standard | Natural | 50 |
| Mini | Colored | 30 |
| Jumbo | Natural | 20 |
Building The Chair Frame
Building the frame is the first step to make your popsicle stick Adirondack chair. The frame holds the chair’s shape and supports weight.
You will need to work carefully to join the sticks straight and strong. This ensures the chair will last and look neat.
Gathering Materials
Start by collecting all the materials you need for the frame. This helps you work smoothly without stopping.
- Popsicle sticks (standard size)
- Wood glue or craft glue
- Ruler or measuring tape
- Sandpaper for smoothing edges
- Clamps or clothespins to hold sticks
- Cutting tool (small saw or scissors)
Cutting And Preparing Sticks
Cut popsicle sticks to the right length based on your chair design. Smooth the edges with sandpaper to avoid splinters.
Prepare all parts before gluing. This saves time and keeps your work clean.
Assembling The Base Frame
The base frame supports the seat and backrest. Build it flat on your work surface for accuracy.
- Lay out sticks side by side for the seat width.
- Glue two longer sticks across the ends for support.
- Add cross braces to keep the frame strong.
- Use clamps or clothespins to hold the parts until dry.
Joining The Backrest Frame
The backrest frame attaches to the base at an angle. Cut the sticks to fit this slant.
| Part | Length (sticks) | Purpose |
|---|---|---|
| Side supports | 6 | Hold backrest angle |
| Horizontal braces | 4 | Connect side supports |
| Top crossbar | 2 | Finish backrest top |
Glue all backrest parts firmly. Let dry before attaching to the base frame.

Credit: www.youtube.com
Finishing Touches And Decoration
Adding finishing touches makes your popsicle stick Adirondack chair look great. It also protects the chair from wear and tear. Decoration lets you add your own style and color.
Use simple methods to finish and decorate your chair. This guide shows easy ideas to complete your project.
Sanding For Smooth Edges
After gluing the sticks, use fine sandpaper to smooth all edges. Sanding removes rough spots and splinters. It helps paint and glue stick better.
Painting And Staining
Choose paint or stain to add color and protect the wood. Use water-based paint for easy cleanup. Apply light coats and let each dry well.
- Use bright colors for a fun look
- Try wood stain for a natural finish
- Apply a clear sealant for extra protection
- Paint designs like stripes or dots for decoration
Adding Cushions And Accessories
Cushions make your tiny chair look cozy. Use fabric scraps or small foam pieces. Attach them with craft glue or double-sided tape.
You can also add small decorations like tiny flowers or stickers. These little touches make your chair unique.
Protective Coating
| Type | Purpose | Application |
| Clear Acrylic Spray | Protects paint | Spray thin layers |
| Polyurethane | Water resistance | Brush on carefully |
| Mod Podge | Seals and adds shine | Brush or sponge |
Use these coatings once paint or stain is dry. They keep your chair looking fresh for longer.

Credit: www.amazon.in
Frequently Asked Questions
What Materials Are Needed For A Popsicle Stick Adirondack Chair?
You need popsicle sticks, wood glue, sandpaper, paint, and clamps. These materials ensure a sturdy, smooth, and colorful mini chair.
How Long Does It Take To Make The Chair?
The project usually takes 2-3 hours, including drying time. Complex designs may require additional time.
Can Kids Safely Make This Popsicle Stick Chair?
Yes, with adult supervision, kids can safely build this chair. It’s a fun, educational craft promoting creativity and fine motor skills.
What Tools Help Assemble The Popsicle Stick Chair?
Basic tools like wood glue, clamps, and sandpaper are essential. Optional tools include a craft knife and paintbrush for finishing touches.
Conclusion
Building a popsicle stick Adirondack chair is fun and simple. You just need patience and basic tools. Each step brings you closer to a cool mini chair. It makes a great decoration or gift. Enjoy crafting and showing off your creation.
Try different colors or sizes next time. Keep practicing to improve your skills. Small projects like this boost creativity and focus. Now, start your project and see the joy it brings!


