
Imagine relaxing on a chair that reminds you of your favorite water ski, perfectly blending comfort with a touch of summer fun. If you’ve ever wanted a unique Adirondack chair that stands out, making one from a water ski is the perfect project for you.
It’s easier than you think, and the result will be a conversation starter every time you sit down. Ready to turn your old water skis into a stylish, cozy seat? Let’s dive into the simple steps that will bring this cool idea to life in your own backyard.
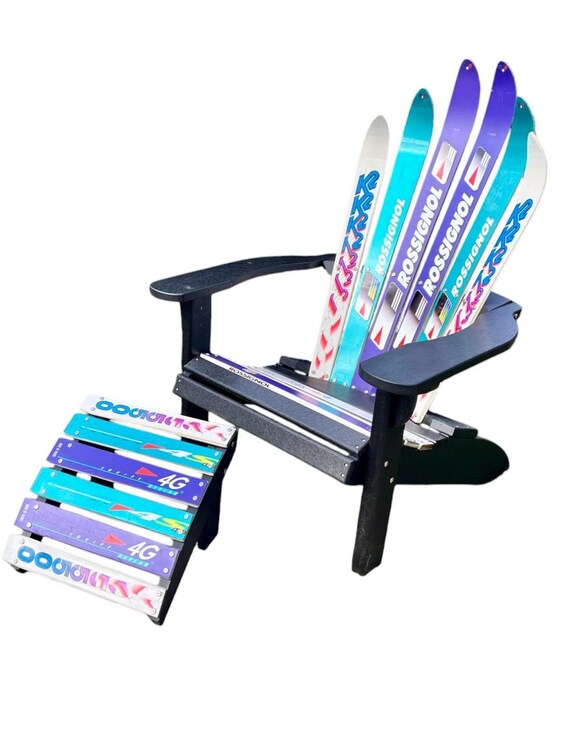
Credit: www.etsy.com
Materials And Tools Needed
Building a water ski Adirondack chair needs some specific materials and tools.
Gather all items before you start to make the project easier and safer.
Wood And Fasteners
Choose durable wood that can handle outdoor use and moisture.
- Recycled water skis or cedar boards
- Weather-resistant screws
- Wood glue suitable for outdoor use
- Sandpaper (medium and fine grit)
Cutting And Shaping Tools
You will need tools to cut and shape the wood or skis into parts.
| Tool | Purpose |
| Jigsaw | Cut curved shapes from skis or wood |
| Handsaw or circular saw | Make straight cuts |
| Drill | Make holes for screws |
| Screwdriver | Drive screws into wood |
| Clamps | Hold pieces together while drying |
Finishing Supplies
Finish the chair to protect it from water and sun damage.
- Outdoor wood paint or stain
- Clear waterproof sealant
- Paintbrushes or foam brushes
- Rags for cleaning dust

Credit: www.therailingshop.co
Preparing The Water Skis
Creating a Water Ski Adirondack Chair begins with the skis. Preparing them properly ensures the chair is sturdy and unique.
Before you start, gather all necessary tools and inspect the skis. This preparation step is crucial for a smooth assembly process.
Inspect The Water Skis
Check the skis for cracks and damage. They should be in good condition to support weight safely.
Clean The Skis
Remove any dirt or grime from the skis. A clean surface helps paint and varnish adhere better.
- Use a mild detergent and water
- Scrub gently with a soft brush
- Rinse thoroughly and let them dry
Remove Old Bindings
Take off the bindings carefully. Use a screwdriver to unscrew them from the ski surface.
Sand The Surface
Sanding smooths out any rough areas. It also prepares the skis for painting or staining.
Ensure you wear a mask and goggles while sanding. This keeps you safe from dust.
Choose The Finish
Select a paint or stain to match your outdoor decor. Consider durability and weather resistance.
| Finish Type | Durability |
| Paint | High |
| Stain | Moderate |
Assembling The Chair Frame
Building the frame is the main step in making a Water Ski Adirondack Chair. You will join all the parts that form the chair’s shape.
Use strong tools and wood glue to make sure the frame stays solid and lasts long outdoors.
Gathering The Frame Parts
Before starting, collect all wood pieces cut for the frame. Check that each part matches the needed size and shape.
Joining The Seat Supports
Attach the seat supports to the side panels using screws and wood glue. Make sure they are level and evenly spaced for comfort.
- Place supports inside the side panels
- Apply wood glue on contact surfaces
- Use clamps to hold parts firmly
- Drive screws through the side panels into supports
- Check for square corners before tightening
Building The Backrest Frame
The backrest frame attaches at the rear of the side panels. Use screws to fix the horizontal slats between the vertical supports.
| Component | Material | Quantity |
| Vertical Supports | Water ski wood | 2 |
| Horizontal Slats | Water ski wood | 4 |
| Wood Screws | Stainless steel | 12 |
Checking Frame Alignment
Ensure the frame is square and level before final tightening. Use a carpenter’s square and level tool to check angles and flatness.
Finishing Touches And Maintenance
After building your water ski Adirondack chair, finishing touches make it look great and last longer. Proper maintenance keeps the chair safe and strong for years.
Use simple steps to protect the wood and keep your chair clean. Small efforts help avoid damage from weather and wear.
Sanding And Sealing
Sanding smooths the wood and removes rough spots. It helps the paint or sealant stick better. Use fine sandpaper for a soft finish.
Apply a waterproof sealant to protect the chair from water and sun. Choose a sealant made for outdoor wood furniture.
- Sand all surfaces evenly
- Clean off dust before sealing
- Use a brush or cloth for sealant
- Apply two coats for best protection
Painting Or Staining
Paint or stain adds color and extra protection. Stain shows the wood grain, while paint covers it completely. Pick a product that resists fading and peeling.
Let each coat dry fully before adding another. Use light sanding between coats for a smooth finish.
- Choose outdoor paint or stain
- Apply thin, even coats
- Allow proper drying time
- Sand lightly between coats
Regular Cleaning
Clean your chair regularly to remove dirt and debris. Use mild soap and water with a soft brush or cloth. Avoid harsh chemicals that can damage the finish.
Rinse the chair well and let it dry completely before use or storage. Clean chairs last longer and look better.
- Use mild soap and water
- Scrub gently with a soft brush
- Rinse thoroughly with water
- Dry in the sun or shade
Storage Tips
Store the chair in a dry, covered place during bad weather or winter. Keep it off the ground to prevent moisture damage.
If you cannot store it indoors, use a waterproof cover to protect it from rain and snow.
- Store indoors if possible
- Use waterproof covers outside
- Keep off wet ground
- Check cover for tears regularly
Inspect And Repair
Check your chair often for loose screws or cracks in the wood. Tighten screws and fix small cracks early to avoid bigger problems.
Replace any damaged parts to keep the chair safe and comfortable. Regular care helps your chair last many seasons.
- Look for loose screws and tighten
- Check wood for cracks or splits
- Repair or replace damaged parts
- Reapply sealant or paint as needed

Credit: www.ebay.com
Frequently Asked Questions
What Materials Are Needed For A Water Ski Adirondack Chair?
To make a Water Ski Adirondack Chair, you need old water skis, wood screws, waterproof glue, sandpaper, and outdoor paint. These materials ensure durability and a stylish finish suitable for outdoor use.
How Long Does It Take To Build This Chair?
Building a Water Ski Adirondack Chair typically takes 4 to 6 hours. This includes cutting, assembling, sanding, and painting the skis into a comfortable chair.
Can Beginners Make A Water Ski Adirondack Chair?
Yes, beginners can make this chair with basic woodworking skills. Clear instructions and proper tools make the process manageable and rewarding.
How Do You Ensure The Chair Is Weather-resistant?
Use waterproof glue and outdoor paint to protect the chair. Seal all surfaces and joints to prevent water damage and extend its life outdoors.
Conclusion
Building a Water Ski Adirondack Chair is a fun and rewarding project. You get a comfortable chair made from recycled water skis. It adds a unique touch to your outdoor space. Plus, you learn handy woodworking skills along the way.
Take your time and follow each step carefully. Soon, you will enjoy sitting in a chair you built yourself. Give it a try and enjoy the process!


