
Are you tired of clutter in your entryway? Imagine having a stylish hall tree with a storage bench that keeps everything organized and within reach.
Building one yourself might sound tricky, but it’s easier than you think—and it saves you money while giving your home a personal touch. In this guide, you’ll discover simple steps to create a functional and beautiful piece that fits your space perfectly.
Ready to transform your entryway and add smart storage? Let’s get started!
Materials And Tools Needed
Building a hall tree with a storage bench needs some basic materials and tools. Knowing what you need helps you plan and work faster.
This guide lists the main items to gather before starting your project.
Wood Materials
Choose strong wood to build the frame and bench. Pine and plywood are common choices.
- 1x pine boards for the frame and shelves
- Plywood sheets for the bench seat and backing
- Wood screws for assembly
- Wood glue for extra strength
- Sandpaper for smoothing surfaces
Hardware And Accessories
Hardware helps your hall tree work well and look good. Hooks and hinges are important.
- Metal hooks for hanging coats and bags
- Hinges for the storage bench lid
- Handles or knobs for the bench lid
- Wood filler to hide screw holes
- Paint or stain for finishing
Tools Required
Use these tools to cut, assemble, and finish your hall tree.
- Measuring tape for accurate dimensions
- Circular saw or handsaw for cutting wood
- Power drill for drilling holes and driving screws
- Screwdriver for tightening screws
- Clamps to hold pieces while gluing
- Sanding block or electric sander for smooth edges
- Paintbrush or roller for finishing
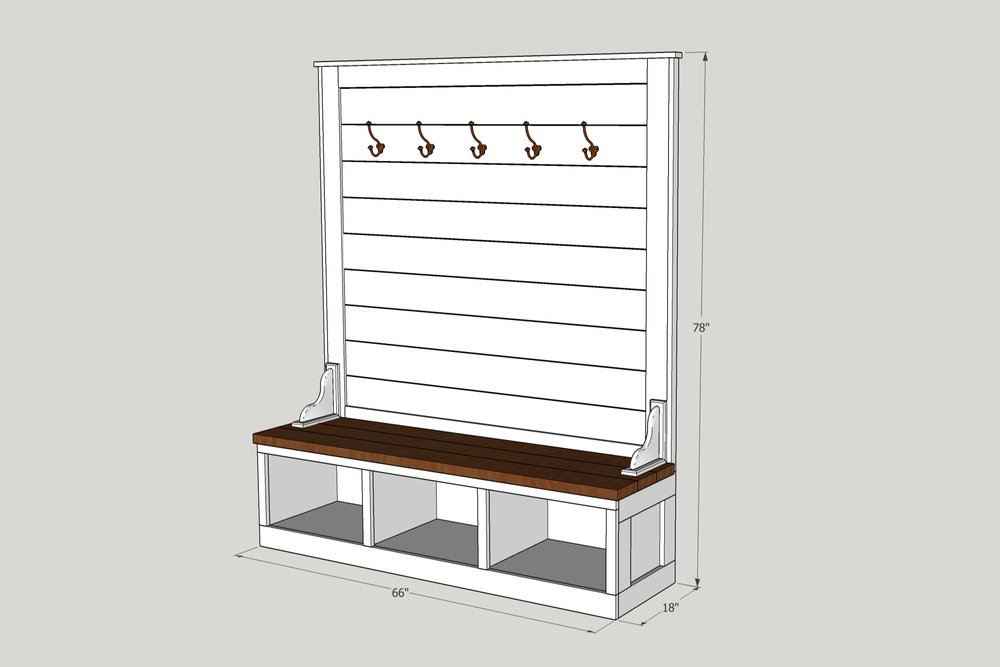
Credit: www.theawesomeorange.com
Preparing The Wood Pieces
Building a hall tree with a storage bench starts with preparing the wood pieces. This step ensures all parts fit together seamlessly for a sturdy and attractive piece of furniture.
Carefully measure and cut each wood piece according to your design plan. Proper preparation prevents future issues during assembly.
Gathering The Required Tools
Before cutting, make sure you have all necessary tools. This keeps your workflow smooth and efficient.
- Measuring tape
- Carpenter’s square
- Hand saw or power saw
- Sandpaper or a sanding block
Selecting The Right Wood
The wood type affects the durability and look of your hall tree. Choose a type that suits your needs and budget.
| Wood Type | Characteristics |
| Pine | Lightweight, cost-effective |
| Oak | Durable, classic appearance |
| Maple | Strong, smooth finish |
Measuring And Marking
Accurate measurements are crucial to ensure all pieces fit correctly. Use a pencil to mark where cuts need to be made.
Assembling The Hall Tree Frame
Building a hall tree with a storage bench starts with assembling the frame. The frame holds everything together and keeps the structure strong.
Focus on following the steps carefully to make sure the frame fits perfectly. Use the right tools to make assembly easier and safer.
Prepare Your Materials And Tools
Before you start, gather all wood pieces, screws, and tools. Check the parts to confirm nothing is missing or damaged.
- Wood panels for sides, back, and bench base
- Screws and wood glue
- Drill and screwdriver
- Measuring tape and level
Attach The Side Panels
Start by fixing the two side panels to the bottom bench base. Use screws and wood glue for strong joints.
Make sure the panels are straight and flush. Check with a level before tightening screws fully.
- Apply wood glue on edges
- Align side panels with bench base
- Pre-drill screw holes to avoid wood splitting
- Screw panels tightly but do not over-tighten
Install The Back Panel
Next, place the back panel between the side panels. This panel adds stability to the frame.
Secure it with screws through the side panels into the back panel edges. Check that the frame forms a right angle.
- Fit back panel inside the frame
- Use a square tool to confirm right angles
- Pre-drill holes on side panels
- Screw the back panel firmly
Attach The Upper Frame Pieces
Attach the top rail and any vertical supports above the bench. These parts hold hooks or shelves later.
Align each piece carefully and secure with screws. Double-check the frame remains square after attaching.
- Place top rail between side panels
- Add vertical supports if included
- Pre-drill and screw each piece
- Use level and square for accuracy
Check Frame Stability And Squareness
After assembling all frame parts, check the whole structure. It should feel solid and not wobble.
Use a level and square tool to confirm all corners are 90 degrees. Tighten screws if needed.
- Test for wobbling by gently shaking
- Check each corner with a carpenter’s square
- Confirm the frame is level front to back
- Tighten any loose screws
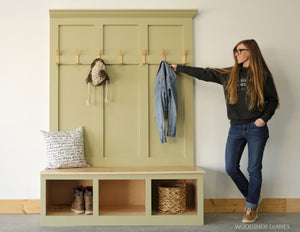
Credit: woodshop-diaries.myshopify.com
Adding Storage Bench And Finishing Touches
The storage bench is a key part of a hall tree. It offers a place to sit and store items neatly. Finishing touches make the hall tree look complete and polished.
In this guide, learn how to add a storage bench and apply finishing details. These steps help create a useful and attractive piece of furniture.
Building The Storage Bench
Start by cutting wood pieces for the bench seat and sides. Assemble the frame with screws and wood glue. Make sure the bench is sturdy and square.
- Cut two side panels
- Cut the bench seat to size
- Attach the seat to the side panels
- Add support braces underneath
- Secure all joints with screws and glue
Adding Storage Space Inside
Create a lid for the bench seat that opens easily. Attach hinges to connect the lid to the seat frame. This allows access to the storage inside.
Consider adding a small handle or cutout on the lid. This feature helps to open and close the bench smoothly.
Applying Finishing Touches
Sand all surfaces until smooth. Remove dust with a cloth before painting or staining. Choose a finish that matches your room decor.
- Sand wood with fine-grit sandpaper
- Clean dust from all surfaces
- Apply primer if you paint
- Use paint or stain evenly
- Seal with a clear topcoat for protection
Adding Hooks And Accessories
Install hooks above the bench for coats and bags. Use screws to fix hooks securely into the wood. You can also add baskets or shelves for extra storage.
| Accessory | Purpose |
| Hooks | Hang coats and hats |
| Baskets | Store small items |
| Shelves | Hold shoes or decor |
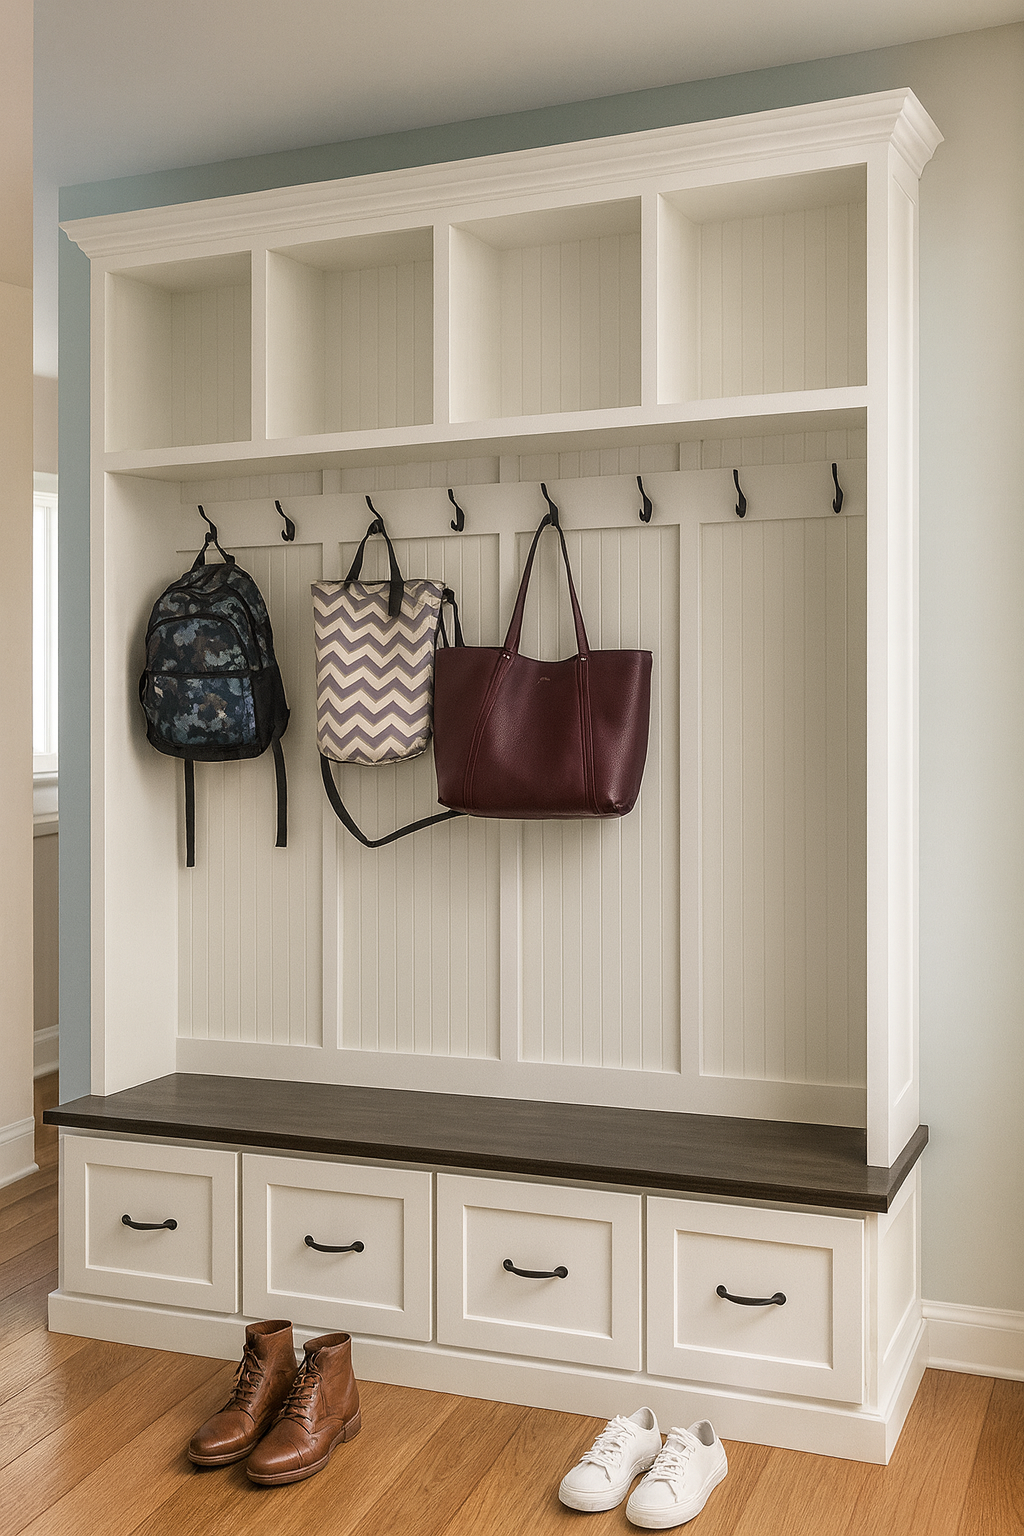
Credit: griffinfurniture.net
Frequently Asked Questions
What Materials Are Needed To Build A Hall Tree With Storage Bench?
You need wood panels, screws, nails, wood glue, paint, and finishing tools. Choose durable wood like pine or oak for strength and aesthetics.
How Long Does It Take To Build A Hall Tree With Storage Bench?
Building a hall tree typically takes 6 to 8 hours. This includes cutting, assembling, sanding, and painting or staining the wood.
Can I Customize The Storage Bench Size In A Hall Tree?
Yes, you can customize the bench size to fit your space. Adjust dimensions before cutting wood to ensure a perfect fit.
What Tools Are Essential For Building A Hall Tree?
Essential tools include a saw, drill, screwdriver, measuring tape, level, and sander. These help ensure accurate cuts and secure assembly.
Conclusion
Building a hall tree with a storage bench adds style and function to your home. It keeps your space tidy and organized every day. You can customize it to fit your needs and room size. The project is simple and rewarding for all skill levels.
Start with the right tools and follow each step carefully. Enjoy the extra storage and seating that this piece provides. Your entryway will look neat and welcoming. A hall tree with storage bench is a smart addition to any home.


