
Are you eager to add a personal touch to your bedroom? Building your own footboard is a fantastic way to do just that.
Whether you’re looking to upgrade your bed’s style or just love DIY projects, constructing a footboard can be both rewarding and fun. Imagine the satisfaction of relaxing in a room that reflects your creativity and skills. Plus, by making it yourself, you can customize it to perfectly match your room’s decor and your personal taste.
Stay with us as we guide you through the simple steps to create a beautiful and unique footboard that will transform your bedroom into a cozy haven. Ready to get started? Let’s dive in!
Credit: howtospecialist.com
Choosing Materials And Tools
Choosing the right materials and tools sets the foundation for a successful footboard project. The quality of your wood and the precision of your tools directly affect the look and durability of your finished piece.
Before you start cutting or assembling, think about the style and strength you want your footboard to have. Are you aiming for a rustic charm or a sleek modern design? Your choice of wood and tools will help you achieve that vision.
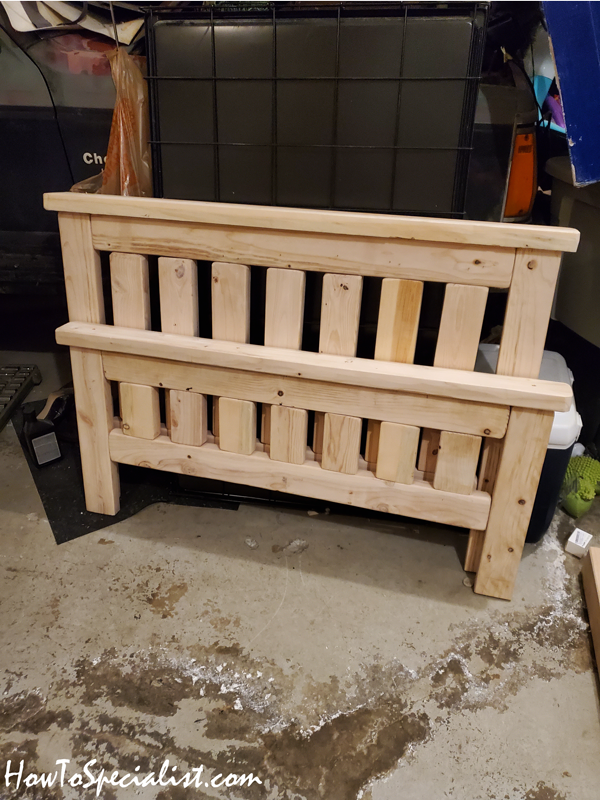
Selecting The Right Wood
Wood type matters more than you might think. Pine is affordable and easy to work with, making it perfect for beginners. If you want something sturdier and more elegant, hardwoods like oak or maple offer durability and a beautiful finish.
Consider the wood’s grain and color. A straight grain gives a clean look, while knots can add character but may require extra sanding. Also, think about how the wood will react to paint or stain—some woods absorb finish unevenly.
Ask yourself: Will your footboard be exposed to moisture or heavy use? If yes, choose wood that resists warping and damage, such as cedar or teak. This upfront decision saves you from headaches later on.
Essential Tools Checklist
Having the right tools makes your build smoother and safer. Here’s a list of essentials you’ll need:
- Measuring Tape:Accuracy starts here; don’t guess your cuts.
- Power Drill:Speeds up screwing and pre-drilling holes.
- Wood Saw:A circular saw or handsaw works fine depending on your comfort.
- Sander or Sandpaper:Smooth edges and surfaces for a polished look.
- Clamps:Keep pieces steady while glue or screws set.
- Wood Glue:Adds extra strength to joints.
- Screwdriver:For any manual adjustments or tight spots.
Think about your workspace too. A stable workbench and good lighting can prevent mistakes and injuries. Have you set up a comfortable area that keeps all your tools within reach?

Credit: www.familyhandyman.com
Cutting And Assembling The Frame
Cutting and assembling the frame is a crucial phase in building your footboard. Accuracy here sets the foundation for a sturdy and visually appealing piece. Taking your time to measure, cut, and join the wood properly ensures your footboard will last for years.
Measuring And Cutting Wood Pieces
Start by carefully measuring the dimensions for each wood piece. Use a tape measure to mark the exact lengths on the boards. Double-check your measurements to avoid costly mistakes.
Cut the wood with a saw that suits the type of wood you are using— a circular saw or miter saw works well for straight cuts. Keep your cuts smooth and straight for better fitting later. Have a sanding block ready to smooth any rough edges after cutting.
Have you ever tried to assemble a frame with uneven wood pieces? It can turn your project upside down. Precise measuring and cutting save you from this frustration.
Joining The Frame Components
Once the pieces are cut, it’s time to join them to form the frame. Align the wood pieces on a flat surface and use clamps to hold them in place. This ensures the frame stays square as you work.
Use wood glue along the edges before screwing or nailing the pieces together. The glue adds strength and helps prevent the frame from wobbling. Screws offer a stronger hold than nails, so consider using them for durability.
Pay attention to the corners— a tight, square joint is key to a solid frame. Use a carpenter’s square or speed square to check angles. How confident are you in your ability to get perfect corners? Take your time to get it right; it makes all the difference.
Finishing Touches
Finishing touches bring your footboard project to life. These final steps create a smooth, attractive surface that lasts. Careful attention here improves both look and feel.
Sanding And Smoothing Surfaces
Start by sanding all wood surfaces carefully. Use medium-grit sandpaper to remove rough spots and edges. Follow with fine-grit sandpaper to smooth the wood. Sand in the direction of the wood grain for best results.
Wipe away dust with a clean, dry cloth. Check for any remaining rough areas and sand again if needed. Smooth surfaces make the paint or stain apply evenly and look better.
Applying Paint Or Stain
Choose paint or stain that fits your style and wood type. Use a brush or cloth to apply the finish evenly. Apply thin coats to avoid drips and uneven color.
Let each coat dry fully before adding the next one. For a natural look, stain highlights the wood grain. Paint offers a solid, colorful finish. Seal the surface with a clear topcoat for protection.

Credit: whiskeyandwhit.com
Frequently Asked Questions
What Materials Do I Need To Build A Footboard?
You need wood planks, screws, sandpaper, wood glue, paint or stain, and mounting brackets. Choose durable wood like pine or oak for stability and a polished look.
How Do I Measure For A Custom Footboard?
Measure the width of your bed frame and desired height of the footboard. Ensure measurements align with mattress size and room space for a perfect fit.
What Tools Are Essential For Footboard Construction?
Essential tools include a saw, drill, screwdriver, measuring tape, level, and clamps. These help cut, assemble, and secure the footboard parts accurately and safely.
How Long Does It Take To Build A Footboard?
Building a footboard typically takes 4 to 8 hours. Time varies based on design complexity, skill level, and drying time for paint or stain.
Conclusion
Building a footboard can be a fun and rewarding project. You only need basic tools and simple steps. Take your time to measure and cut carefully. Sand the wood well for a smooth finish. Choose a design that fits your style and bed size.
With patience, you will create a sturdy and attractive footboard. Enjoy the pride of making your own furniture piece. This project adds charm and comfort to your bedroom. Give it a try and see the results yourself!


