
Are you looking to create a stunning buffet that fits perfectly in your space without spending a fortune? Building a buffet from stock cabinets is a smart and affordable way to get exactly what you want.
Imagine having a beautiful, custom-looking piece that stores your dishes and adds style to your dining area—all made by you. In this guide, you’ll discover simple steps and insider tips to turn basic cabinets into a show-stopping buffet. Keep reading, and soon you’ll have a project that’s both practical and impressive.

Credit: www.youtube.com
Choosing The Right Stock Cabinets
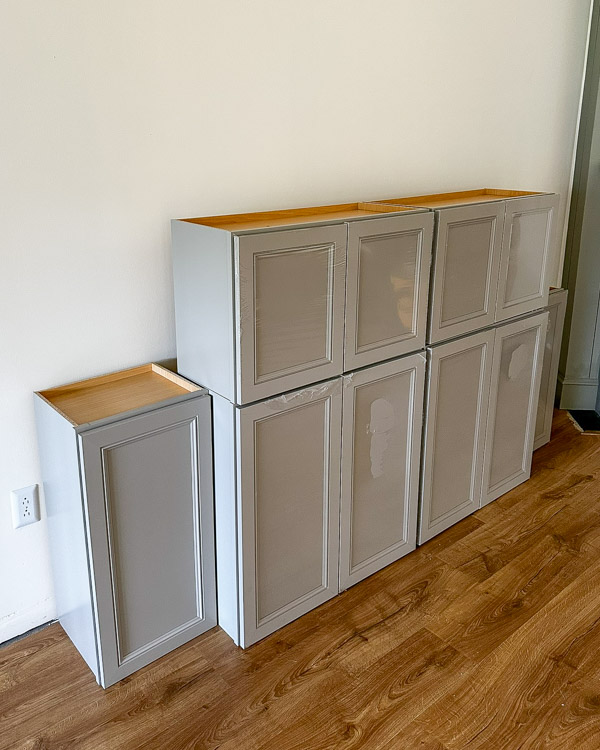
Building a buffet from stock cabinets is a smart way to save time and money. Picking the right cabinets is key to a good result.
Stock cabinets come in many styles and sizes. Knowing your options helps you choose what fits your space and style.
Types Of Stock Cabinets
Stock cabinets are ready-made and come in standard sizes. There are base cabinets, wall cabinets, and tall cabinets.
Base cabinets sit on the floor and support the countertop. Wall cabinets hang on the wall for extra storage. Tall cabinets reach from floor to ceiling.
- Base cabinets: for the buffet’s bottom part
- Wall cabinets: add storage above the buffet
- Tall cabinets: great for large storage spaces
Measuring Your Space
Measure the area where you want the buffet carefully. Note the width, height, and depth to find the right cabinet size.
Check for any obstacles like outlets or vents that could affect cabinet placement. Accurate measuring helps avoid mistakes.
- Measure width from wall to wall
- Measure height from floor to ceiling
- Measure depth for cabinet and countertop fit
- Look for obstacles in the space
Selecting Materials And Finishes
Stock cabinets come in different materials like wood, plywood, and MDF. Each material has pros and cons for durability and cost.
Finishes affect how the buffet looks and how easy it is to clean. Choose finishes that match your room’s style and your maintenance needs.
- Wood: strong and natural but can be expensive
- Plywood: durable and less costly than wood
- MDF: smooth surface, affordable but less sturdy
- Painted finish: offers color variety and easy cleaning
- Laminate finish: resists scratches and moisture
Credit: angelamariemade.com
Preparing Cabinets For Assembly
Building a buffet from stock cabinets is a fun project. It involves preparing cabinets before assembly. This ensures a smooth and strong finish.
Follow these steps to get your cabinets ready. Proper preparation will save time and effort.
Removing Doors And Hardware
First, take off the cabinet doors. Use a screwdriver to remove the hinges. Keep the screws and hinges safe for later use.
Next, remove any handles or knobs. This makes it easier to paint and sand the cabinet surface.
Sanding And Painting
Sanding helps the paint stick better. Use sandpaper to smooth out rough areas. This step is important for a nice finish.
After sanding, wipe the dust off with a damp cloth. Then, apply a coat of primer before painting the cabinets.
- Choose a paint color that matches your decor.
- Use a brush or roller for even coverage.
- Allow the paint to dry completely before assembly.
Reinforcing Cabinet Frames
Check the cabinet frames for any weak spots. Reinforcing them ensures the buffet will be sturdy.
Use wood glue and screws to strengthen joints. This adds durability to the finished buffet.
Assembling The Buffet
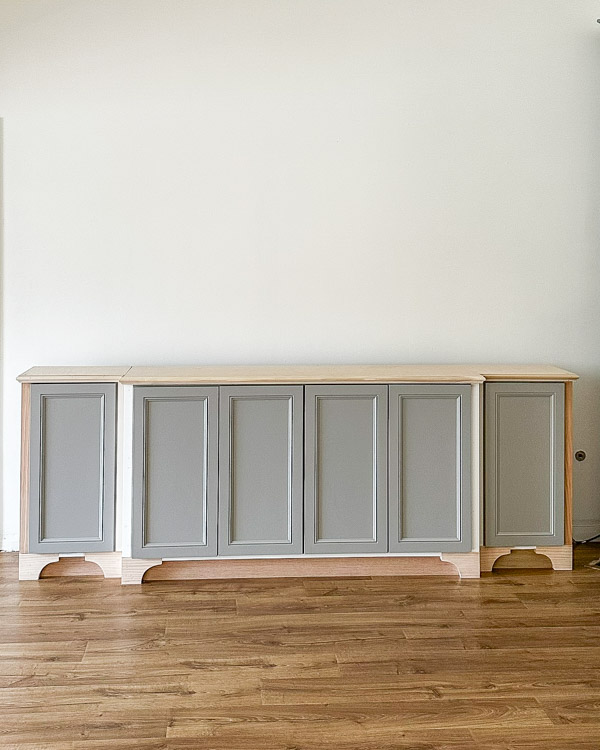
Building a buffet from stock cabinets is a smart way to create custom furniture. The assembly process involves careful alignment, securing the cabinets, adding a countertop, and installing shelves.
Each step helps ensure the buffet is sturdy and functional. Follow these guidelines to complete the assembly with ease.
Aligning And Securing Cabinets
Start by placing the cabinets in the desired position. Make sure the fronts are flush and the sides meet evenly. Use clamps to hold them in place during assembly.
- Check that all cabinets sit level on the floor.
- Adjust with shims if needed to avoid gaps.
- Drill pilot holes through cabinet sides where they meet.
- Drive screws slowly to join cabinets securely.
- Remove clamps and verify the alignment again.
Adding A Countertop
Select a countertop that fits the combined width of the cabinets. Place it carefully on top and check for overhangs or uneven spots.
Attach the countertop using screws or adhesive, depending on the material. Make sure to secure it well to prevent movement.
| Countertop Material | Attachment Method |
| Wood | Wood screws through cabinet tops |
| Laminate | Construction adhesive |
| Stone | Silicone adhesive and brackets |
Installing Shelves And Storage Features
Measure the interior width and depth of each cabinet to fit shelves correctly. Mark shelf heights based on the items you plan to store.
Follow these tips for shelves and storage:
- Use shelf pins or brackets to hold shelves firmly.
- Sand edges to prevent splinters and improve fit.
- Install drawer slides or organizers if needed for better storage.
- Test shelves for stability before placing items.
Finishing Touches
Building a buffet from stock cabinets is a great project. The finishing touches make your buffet look polished and professional. This section covers key steps to complete your buffet.
From attaching doors to adding decorations, each detail improves the final look. Proper maintenance keeps your buffet looking good for years.
Attaching Doors And Handles
Attach cabinet doors carefully to ensure they align well. Choose hinges that fit your cabinet style and weight. Handles add both style and function to your buffet.
- Measure and mark hinge placement on doors and frames.
- Use a drill to attach hinges securely.
- Hang doors and check for smooth opening and closing.
- Select handles that match your buffet’s design.
- Attach handles with screws, ensuring they are level.
Adding Decorative Elements
Decorative elements add character to your buffet. You can use trim, molding, or paint to enhance the look. Small details can make a big difference in style.
- Apply crown molding to the top edge for a classic look.
- Use decorative corner blocks to hide joints.
- Paint or stain the buffet to match your room décor.
- Add trim around doors for extra depth.
Maintaining Your Diy Buffet
Keep your buffet in good shape with regular care. Cleaning and checking hardware prevents damage. Small fixes stop problems from growing.
| Task | Frequency | Notes |
|---|---|---|
| Dust surfaces | Weekly | Use a soft cloth to avoid scratches |
| Check door alignment | Monthly | Tighten screws if doors sag |
| Clean handles and hinges | Monthly | Use mild cleaner and dry well |
| Touch up paint or stain | As needed | Fix chips or scratches promptly |
Credit: angelamariemade.com
Frequently Asked Questions
What Materials Do I Need For Building A Buffet From Stock Cabinets?
You need stock cabinets, screws, wood glue, a drill, sandpaper, paint or stain, and finishing hardware. These basic materials help you assemble and customize your buffet efficiently.
How Do I Customize Stock Cabinets Into A Buffet?
Customize by choosing cabinet sizes, adding shelves, sanding surfaces, and painting or staining. Personalize hardware and finishes for your desired style and function.
Can I Build A Buffet Without Professional Carpentry Skills?
Yes, building a buffet from stock cabinets is beginner-friendly. Basic tools and clear instructions make this project manageable for most DIYers.
How Long Does It Take To Build A Buffet From Stock Cabinets?
It typically takes 4 to 8 hours, depending on skill level and complexity. Allow extra time for drying paint or stain.
Conclusion
Building a buffet from stock cabinets is simple and affordable. Choose cabinets that fit your space and style. Assemble them carefully and add a countertop for a finished look. Personalize your buffet with paint or handles. This project saves money and adds useful storage.
Enjoy your new buffet for meals and gatherings. Try this easy DIY and see the difference. A custom buffet is within your reach.


