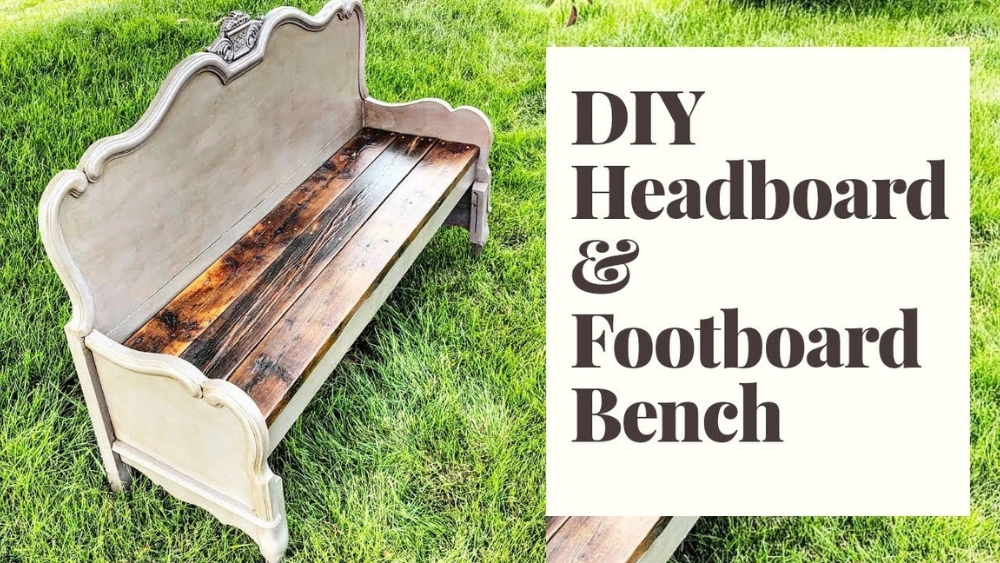
Ever looked at an old bed and thought, “What can I do with that headboard and footboard?” You’re not alone.
Transforming these often-discarded pieces into a stylish and functional bench is more than a DIY project; it’s a chance to bring creativity and sustainability into your home. Imagine the compliments from friends and family when they see your unique, handmade bench.
Excited to get started? We’ll guide you through every step of the process, ensuring your final piece is both beautiful and sturdy. Dive in, and discover how you can turn forgotten furniture into a stunning centerpiece for your home.
Gather Materials And Tools
Gathering the right materials and tools is the first step to building a bench from a headboard and footboard. Having everything ready makes the process smooth and efficient. It helps avoid interruptions and ensures a better result.
Focus on selecting the right headboard and footboard. Then, prepare extra supplies for stability and comfort. Finally, check your tool kit to have everything you need at hand.
Select Headboard And Footboard
Choose a headboard and footboard with sturdy wood and a design you like. The size should match the bench you want to build. Solid wood or hardwood works best for strength. Avoid pieces with cracks or damage.
Consider the style of your space. A vintage or modern look can guide your choice. The height and width of these parts will affect the bench size. Measure carefully before buying or using old furniture.
Prepare Additional Supplies
Gather extra materials to complete your bench. You will need wood screws to join parts firmly. Sandpaper smooths rough edges and surfaces. Wood glue adds extra hold to joints.
Think about a seat cushion or padding for comfort. Choose fabric or foam that fits your style and needs. Paint or wood finish protects the bench and improves its look. Prepare these supplies before starting the build.
Essential Tools Checklist
- Electric drill with drill bits
- Screwdriver (manual or electric)
- Measuring tape
- Carpenter’s square
- Sandpaper or electric sander
- Clamps to hold parts while gluing
- Safety goggles and gloves
- Hammer (optional)
- Pencil for marking
Having this list ensures you won’t stop in the middle of work. Check each tool for good condition. Replace or fix broken tools before you start the project.

Credit: 100things2do.ca
Prepare And Modify Wood Pieces
Preparing and modifying the wood pieces is where your bench project truly begins to take shape. This stage demands attention to detail and a bit of patience, but it sets the foundation for a sturdy and attractive bench. Handling your headboard and footboard carefully ensures the final product is safe and visually appealing.
Remove Old Hardware
Start by taking off any nails, screws, or brackets from the headboard and footboard. Use a screwdriver or pry bar gently to avoid damaging the wood. Have a container nearby to keep all the hardware—you might reuse some pieces later.
Removing old hardware can reveal hidden damage or weak spots in the wood. If you find any cracks or rot, now is the time to address them. Would you want your bench to wobble or break because of overlooked issues?
Cut And Sand Wood
Next, measure and cut the wood pieces to your desired bench size. Remember, cutting accurately affects how well the pieces fit together. Use a saw suited for your wood type to get clean cuts.
After cutting, sand every surface thoroughly. Sanding removes splinters and smooths rough edges, making the bench comfortable and safe to use. Don’t rush this step; a smooth finish makes a big difference in the final look and feel.
Drill Holes For Assembly
Plan where to drill holes for screws or bolts to attach the bench parts securely. Mark each spot carefully to ensure everything lines up perfectly. Use a drill bit that matches the screw size to prevent splitting the wood.
Drilling pilot holes also helps avoid cracks during assembly. Have you thought about the best way to keep your bench stable for years to come? Well-placed holes and strong joins are the key.
Assemble And Finish The Bench
Assembling and finishing the bench brings your project to life. This stage transforms separate pieces into a sturdy, usable bench. Follow clear steps to attach parts securely and give the bench a polished look. A well-assembled bench holds weight and looks great in any space.
Attach Headboard And Footboard
Start by positioning the headboard and footboard parallel to each other. Use wood screws or bolts to join them firmly. Drill pilot holes to prevent wood from splitting. Make sure both pieces are square and aligned. Tighten fasteners until the structure feels solid. Check for wobbling and adjust if needed.
Add Seat Support
Cut a sturdy board for the seat support, fitting between the headboard and footboard. Attach it with screws on both ends. Add extra support beams if the bench is wide. These beams prevent sagging and add strength. Secure all supports tightly for a safe sitting surface.
Paint Or Stain The Bench
Choose paint or stain based on your desired look. Sand the bench lightly to smooth rough edges. Apply a primer if painting for better adhesion. Use even strokes to cover all surfaces. Let each coat dry completely before adding another. Finish with a clear sealant for protection and durability.

Credit: athomewithashley.com

Credit: 100things2do.ca
Frequently Asked Questions
How Do I Prepare Headboard And Footboard For A Bench?
Start by cleaning and sanding both pieces. Remove any hardware or decorations. Ensure they are sturdy and free of damage before assembly.
What Tools Are Needed To Make A Bench From Headboard?
You will need a drill, screws, measuring tape, saw, and sandpaper. Optional tools include clamps and a screwdriver for easier assembly.
Can I Customize The Bench Size Using Headboard Parts?
Yes, you can adjust the length and height by trimming or adding wood. Measure carefully to fit your desired bench dimensions.
How Do I Join Headboard And Footboard Securely?
Use wood screws and brackets to attach the pieces firmly. Reinforce joints with wood glue for extra stability and durability.
Conclusion
Making a bench from a headboard and footboard is simple and fun. You can create a new piece of furniture without buying more wood. It saves money and gives old items new life. Just follow the steps carefully and use basic tools.
This project fits many home styles and adds charm to any room. Give it a try and enjoy your handmade bench. It’s a great way to be creative and practical at the same time.


