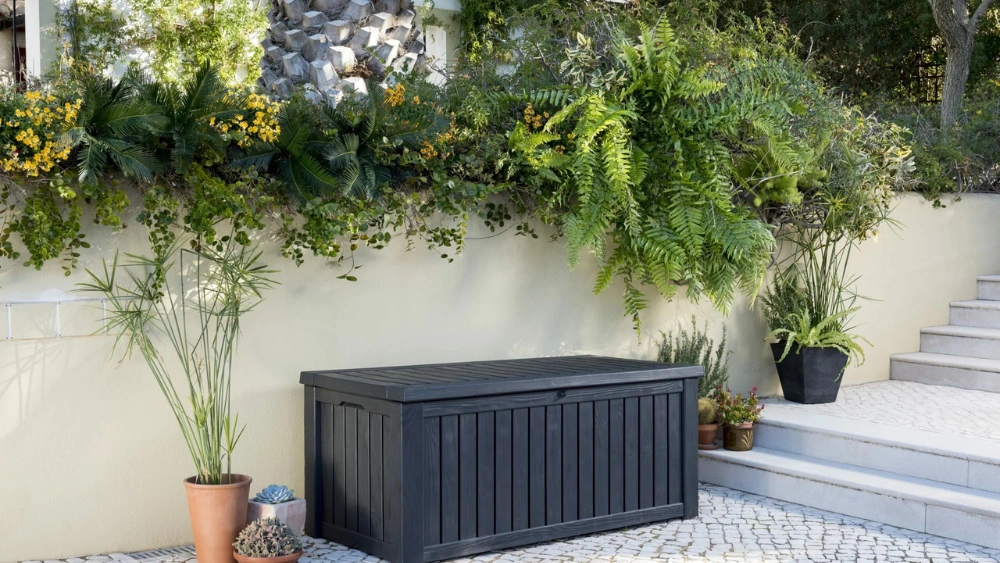
Are you tired of clutter taking over your outdoor space? Imagine having a sturdy, custom storage box right in your backyard—designed exactly to fit your needs.
Building your own DIY outdoor storage box is easier than you think, and it can save you money while giving your space a neat, organized look. In this guide, you’ll discover simple steps to create a durable storage solution that keeps your tools, cushions, and garden supplies safe from the weather.
Ready to take control of your outdoor mess? Let’s get started and make your storage problems disappear.
Choosing Materials
Building a DIY outdoor storage box needs the right materials. Good materials make the box last longer.
Picking the best wood, tools, and weatherproofing supplies helps your project succeed.
Selecting Wood Types
Choose wood that can handle outdoor weather. Some woods resist water and insects better.
Common woods for outdoor boxes include cedar, redwood, and pressure-treated pine.
- Cedar:Naturally resists rot and insects. Light and easy to work with.
- Redwood:Strong and durable. Has natural oils to resist decay.
- Pressure-Treated Pine:Chemically treated to resist moisture and pests. Usually less expensive.
Essential Tools Needed
Having the right tools makes building easier. Use tools that fit the wood and project size.
- Measuring tape to get exact sizes
- Handsaw or power saw for cutting wood
- Hammer or drill for joining pieces
- Screwdriver for screws
- Sandpaper to smooth edges
- Clamps to hold wood while working
Weatherproofing Supplies
Protect your box from rain and sun with weatherproofing supplies. These help wood last longer outside.
Use sealants and paints designed for outdoor use. These block water and UV rays.
- Outdoor wood sealer to block moisture
- Waterproof paint or stain for color and protection
- Wood glue for extra strong joints
- Exterior-grade screws that resist rust

Credit: www.youtube.com
Planning Your Design
Building a DIY outdoor storage box can be a fun and rewarding project. It helps keep your yard organized and tidy. Start with a good design plan to make the building process easy.
Think about what you need before you start cutting wood. A clear plan will save time and reduce mistakes.
Determining Size And Shape
Decide how big you want your storage box to be. Consider what you will store inside. Think about the space available in your yard.
The shape of the box can be a rectangle or square. Choose one that fits your needs best.
- Measure items to be stored
- Consider yard space
- Think about future needs
Creating A Simple Sketch
A simple sketch helps you see your ideas on paper. Draw the box from different angles. Include measurements for each side.
Use a ruler to keep lines straight. This sketch will guide you during building.
Measuring For Accuracy
Accurate measurements are important for a well-fitting storage box. Use a tape measure to get exact numbers. Double-check each measurement.
Write down all measurements. Keep this list handy while building.
- Use a tape measure
- Double-check all measurements
- Keep a record of numbers
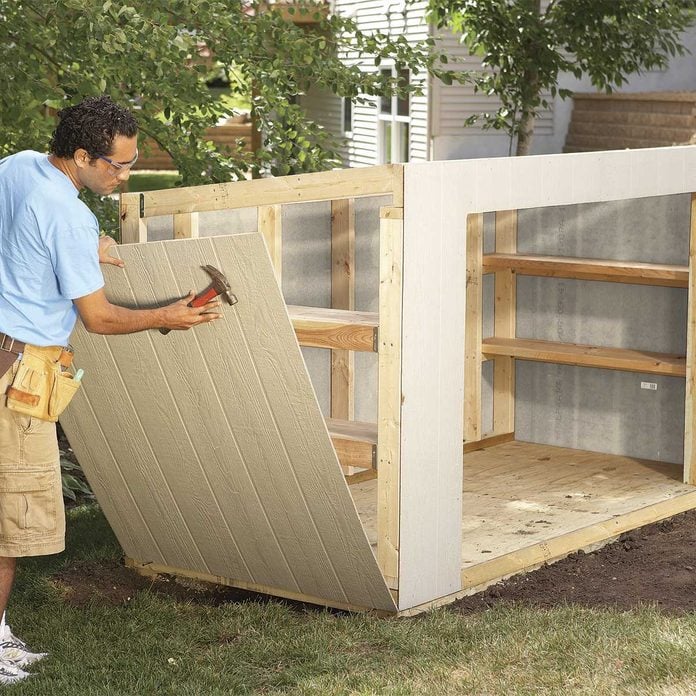
Building The Frame
Building the frame is the first step in creating a sturdy outdoor storage box. The frame gives the box its shape and strength. It is important to measure and cut wood pieces correctly for a solid foundation.
In this guide, you will learn how to cut wood pieces, assemble the base and walls, and secure everything with screws and nails. Following these steps will help you build a durable frame.
Cutting Wood Pieces
Start by selecting quality wood that can withstand outdoor conditions. Use a saw to cut the wood to the required sizes. Accurate cuts ensure the pieces fit together well.
- Measure each piece twice before cutting
- Cut the base frame pieces first
- Cut the wall studs and panels next
- Sand edges to remove splinters
Assembling The Base And Walls
Lay out the base pieces on a flat surface. Join them to form a rectangle or square base. Then, stand the wall pieces upright and connect them to the base.
| Part | Description | Notes |
|---|---|---|
| Base Frame | Four wood pieces forming the bottom | Use weather-resistant wood |
| Wall Studs | Vertical supports for walls | Space evenly for strength |
| Wall Panels | Flat wood pieces for walls | Attach to studs securely |
Securing With Screws And Nails
Use screws and nails to hold the frame together tightly. Screws offer strong grip and can be removed if needed. Nails are quick to use but less adjustable.
Tips for fastening the frame:
- Pre-drill holes to avoid wood splitting
- Use galvanized screws and nails to prevent rust
- Check alignment before fully tightening
- Use clamps to hold pieces steady while fastening
Credit: www.familyhandyman.com
Finishing Touches
Finishing your DIY outdoor storage box makes it last longer. It also keeps your items safe inside.
Focus on adding a lid, applying sealant or paint, and installing handles and locks. These steps improve function and look.
Adding A Lid And Hinges
Choose a lid that fits the box well. It should cover the top completely to protect items from rain and dust.
Attach hinges to connect the lid to the box. Use screws that are strong and rust-resistant for outdoor use.
- Measure lid size carefully before cutting
- Use at least two hinges for stability
- Test the lid to open and close smoothly
- Consider adding a support arm for holding lid open
Applying Sealant Or Paint
Seal or paint the box to protect it from weather damage. Use products made for outdoor wood.
Apply at least two coats for best protection. Let each coat dry fully before adding the next.
- Clean the box surface before applying
- Use a brush or roller for even coverage
- Wear gloves and work in a ventilated area
- Choose water-resistant sealant or outdoor paint
Installing Handles And Locks
Handles make the box easy to move and open. Locks keep your items safe from theft or animals.
Attach handles on the sides or front. Choose locks that fit your security needs and box design.
- Use screws that fit the handle or lock hardware
- Place handles where you can lift comfortably
- Test locks to ensure they work smoothly
- Consider weatherproof locks for outdoor use

Credit: m.youtube.com
Frequently Asked Questions
What Materials Are Best For A Diy Outdoor Storage Box?
Pressure-treated wood is ideal for durability and weather resistance. Cedar and redwood are also great options for natural rot resistance. Use waterproof sealant to extend the box’s lifespan and protect against moisture and insects.
How Do I Make My Outdoor Storage Box Weatherproof?
Apply a high-quality waterproof sealant or paint designed for outdoor use. Ensure all joints are sealed tightly, and use weather-resistant hardware like stainless steel screws. Adding a sloped lid helps water runoff and prevents pooling on top.
What Size Should My Diy Outdoor Storage Box Be?
Choose a size based on your storage needs and available space. Common dimensions range from 3 to 6 feet in length and 2 to 3 feet in height. Ensure it’s large enough to store your items but compact enough for your outdoor area.
Can I Build An Outdoor Storage Box Without Power Tools?
Yes, you can build one using hand tools like a handsaw, hammer, and screwdriver. It may take longer but is possible with careful measuring and patience. Choose simple designs to make the process easier without power tools.
Conclusion
Building your own outdoor storage box saves money and fits your space. You can choose the size, style, and materials that work best. It also gives a chance to learn new skills and enjoy a fun project. Keep your tools and garden supplies neat and dry.
A sturdy box lasts many years with simple care. Start small and add features as you go. DIY projects bring pride and useful results. Your outdoor space looks tidier and more organized too. Give it a try—you might enjoy the process more than expected.